In this post i'd like to show you a simple approach to the DataMacro at the Table level. I've been playing around with the [CreateDataMacro]. You can find this option in table design and apply this to the tabledata you are currently working on. (You can click on the images to enlarge the view)
Let me show you...
For this example i used a table with a couple of fields and i wanted to achieve an after update trigger for the record. The final outcome should be:
When the value of the field status="Completed" the value of the field [Percentage Completed]=100%. For other options from the combo i will chose different percentages.
So first things first let's find the action button to create the DataMacro. When in table design collapse the [Create Data Macro's] button. This is where you will find the various event triggers. Once you have added a data macro you can always check to see if any data macro's are present because in that case you'll see a small square around the trigger icon (in this example the after update option).
Next step:
You will be presented with a blank data tab where you are expected to write your own events. This might be scary at first because you have to discover the approach of creating the triggers.
In this case we are trying to create an after update event. We'll do so by using a simple IF statement.
IF - statement
On the right side of the screen you can see the Action Catalog. This is the place where you can choose the various actions. And as usual you can Drag the IF statement from the action catalog to the [Add New Action] frame. Drop it in the frame and you are presented with the view you can see in the picture shown on the right. Click in the block after the IF word and start typing the name of the field that has to be checked for a value. In our case it will be the [Status] field. Nice feature is the auto complete / intellisense option which appears when typing your field name. It's often that you don't even have to type the complete fieldname... brilliant!
ELSE IF
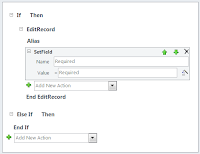
A very important step is to add a [Add Else] or [Add Else If]. In our sample we added an Else If statement. That's not the hard option, just click on that option on the right side of the If block and it will be added to your macro. But it's important to choose the right action which should follow after the trigger fires. In our case it should [Edit a record]. That's the option we choose from the Action Catalog and drag it to the if block already present. Now add one final step namely the [set field] option from the catalog. Like previously drag and drop it to the logical place in the IF block. You sample should look something like this:
Summary:
1. Add an IF block from the Action Catalog
2. Add an [Data Block] - [Edit Record] and drag and drop this in the IF block
3. Add a [Data Actions] - [Set Field] and drag and drop this in the [Edit Record] block
repeat the steps for the else if block (copy does the trick ;-)
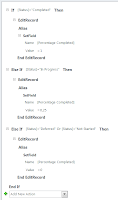
Now you are ready to fill in the appropriate fields in the various blocks. I've added an already filled in macro picture to clarify.
Explanation:
In the first step we added the field [Status] and set the validation to check the value of the field to "Completed". In the second step we added the setfield option to the field that has to be updated; in this case the field [Percentage Completed] and filled in the value field to the value 1 (being 100%).
The Elseif statement can be filled in the same way with a different validation. In the third step I added an Or validation to tackle two options which would set the value of the [Percentage Complete] field to 0 (0%). All the other options should be a piece of cake now ;-)
Save and check-try
Ofcourse you are curious to check if the data macro works. Save your macro (or click close and then choose yes). Now look at the table in datasheet view and fill in one record. When you go to the next record you will see that the appropriate field [Percentage Completed] is updated with the values as set in the datamacro. And you know what the beauty of it is? When you create a form which has this table as a datasource the datamacro will also work on your newly created form.
Conclusion...
A great feature has been added to this Access version. It might take some getting used to but it's worthwhile getting to know it. Did i mention that you can save the macro's ouside your project and that you can reuse them in other projects..no.. well you can. So don't dive back into VBA when you are getting stuck the first time. Practice a little and you'll see that this is time well spent.
MCT Monthly Newsletter - July 2020
5 years ago


.png)
No comments:
Post a Comment