Monday, March 29, 2010

OneNote: Create Your Own Template in OneNote

When I started using OneNote i quickly felt the need of creating my own OneNote book template. It was hard to find how you actually have to do this so i decided to describe the steps in this article.
Sure enough you can make quick templates but often that resembles the current section you are using. What i mean is that we want to create a whole onenote book as designed by the user. So here we go.

Creating the OneNote Book and Saving it as a Template
1. Create your own OneNote book just the way you like it. Remember that it has to become a template so create pages where you describe what to expect from the user. Create sections add everything you need.
2. For my sample i created a simple book called Blog where i write my blog documents. For every application i have a seperate tab. Simple as can be but the goal here is to show you how you can use it as a template.
3. As you know OneNote saves everything directly so you don't have to save anything. Well in this case you do have to make a seperate save to create a template from your OneNote book. So goto the [SaveAs] option and here is where you have to make two seperate choices before you click save.
4. In the combobox [Save as type] choose the option: OneNote Single File Package (*.onepkg)


5. Next choose the third radiobutton which states "current notebook"


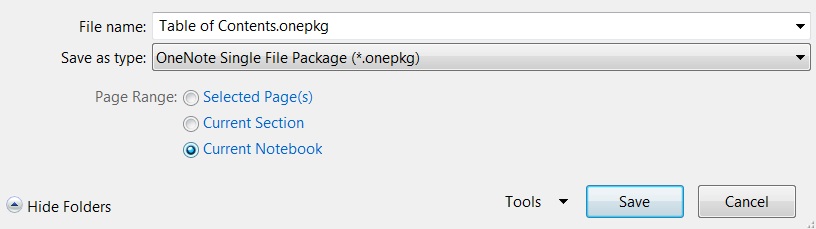
The last option is important because otherwise the current section is saved as a template and we want the whole book.

Placing the template in the correct directory
When the template is saved it's important to save it in the correct location so it will show up in the dialog when you create a new OneNote Book. To do this save the  .onepkg file in the following directory:

\Program Files\Microsoft Office\Templates\1033\ONENOTE\12\Notebook Templates

if saved in this directory you template will show up in the create new book dialog as follows:


see that the newly added "Blog" template is accessible

Remarks:

1. If you have a 64 bit Windows installed with a 32bits Office you may have to look here...
\Program Files (x86)\Microsoft Office\Templates\1033\ONENOTE\12\Notebook Templates
2. If you have another language installed you may have to look in another folder so change it accordingly: (the blue section might be another number for your specific language...)
\Program Files\Microsoft Office\Templates\1033\ONENOTE\12\Notebook Templates

Now when you have created a template and you want to share with the world upload it on Microsoft Online. If you just want to share it with your colleagues then distribute the appropriate way so it will end up in their 'new' dialog. Remember you did the hard work, all they have to do is use it ;-) 

Saturday, March 27, 2010

Access: Data Macro - First steps to a new approach

In this post i'd like to show you a simple approach to the DataMacro at the Table level. I've been playing around with the [CreateDataMacro]. You can find this option in table design and apply this to the tabledata you are currently working on. (You can click on the images to enlarge the view)

Let me show you...
For this example i used a table with a couple of fields and i wanted to achieve an after update trigger for the record. The final outcome should be:
When the value of the field status="Completed" the value of the field [Percentage Completed]=100%. For other options from the combo i will chose different percentages.
So first things first let's find the action button to create the DataMacro. When in table design collapse the [Create Data Macro's] button. This is where you will find the various event triggers. Once you have added a data macro you can always check to see if any data macro's are present because in that case you'll see a small square around the trigger icon (in this example the after update option).

Next step:
You will be presented with a blank data tab where you are expected to write your own events. This might be scary at first because you have to discover the approach of creating the triggers.
In this case we are trying to create an after update event. We'll do so by using a simple IF statement.

IF - statement
On the right side of the screen you can see the Action Catalog. This is the place where you can choose the various actions. And as usual you can Drag the IF statement from the action catalog to the [Add New Action] frame. Drop it in the frame and you are presented with the view you can see in the picture shown on the right. Click in the block after the IF word and start typing the name of the field that has to be checked for a value. In our case it will be the [Status] field. Nice feature is the auto complete / intellisense option which appears when typing your field name. It's often that you don't even have to type the complete fieldname... brilliant!

ELSE IF
A very important step is to add a  [Add Else] or [Add Else If]. In our sample we added an Else If statement. That's not the hard option, just click on that option on the right side of the If block and it will be added to your macro. But it's important to choose the right action which should follow after the trigger fires. In our case it should [Edit a record]. That's the option we choose from the Action Catalog and drag it to the if block already present. Now add one final step namely the [set field] option from the catalog. Like previously drag and drop it to the logical place in the IF block. You sample should look something like this:

Summary:
1. Add an IF block from the Action Catalog
2. Add an [Data Block] - [Edit Record] and drag and drop this in the IF block
3. Add a [Data Actions] - [Set Field] and drag and drop this in the [Edit Record] block

repeat the steps for the else if block (copy does the trick ;-)

Now you are ready to fill in the appropriate fields in the various blocks. I've added an already filled in macro picture to clarify.

Explanation:
In the first step we added the field [Status] and set the validation to check the value of the field to "Completed". In the second step we added the setfield option to the field that has to be updated; in this case the field [Percentage Completed] and filled in the value field to the value 1 (being 100%).
The Elseif statement can be filled in the same way with a different validation. In the third step I added an Or validation to tackle two options which would set the value of the [Percentage Complete] field to 0 (0%). All the other options should be a piece of cake now ;-)

Save and check-try
Ofcourse you are curious to check if the data macro works. Save your macro (or click close and then choose yes). Now look at the table in datasheet view and fill in one record. When you go to the next record you will see that the appropriate field [Percentage Completed] is updated with the values as set in the datamacro. And you know what the beauty of it is? When you create a form which has this table as a datasource the datamacro will also work on your newly created form.

Conclusion...
A great feature has been added to this Access version. It might take some getting used to but it's worthwhile getting to know it. Did i mention that you can save the macro's ouside your project and that you can reuse them in other projects..no.. well you can. So don't dive back into VBA when you are getting stuck the first time. Practice a little and you'll see that this is time well spent.

Access: We're getting there...

So curious as i was i started beta testing Office 2010. I heard many good things about this version. I spent most of my time in Microsoft Access so that would be the first one to take a closer look at. I knew that the Office button wouldn't be around anymore so that was no suprise. Finding 'backstage' instead felt more intuitive for me looking like the old 'File' menu. So starting Access to see what i heard about it was actually as cool as it sounded. In the next couple of posts i'll be looking into some of the added features in Access 2010. I'll describe them as I go along.

Parameter in query
Everyone uses this frequently; the parameter in a query. Often you have to refer to a control on a form or subform to use what the user typed in as the parameter for your query. If you have been around a while you know that this action always ends up as a copy paste action hoping that you didn't make any typo's the first time.

While i was creating my parameter query something popped up during this progress. Wow did I see that correctly or are my eyes deceiving me? Did a dropdown menu just appeared when i added the exclamation mark? Yes it did. I couldn't help cheering for a short moment. Yes this is what we are looking for, this is what make life easy.
Now my only hope would be that all those options i have been dreaming about will eventually make it through to the next versions.
creating the query parameter...

Making your wishes known
Many people i talk to have the tendancy to think that the developers of Microsoft don't care or listen to their comments. I dare to disagree.. there are many options that have been implemented just because the testers and users do post there wishes to newsgroups, blogs, beta groups etc.
You need one more example? Ok how about the recently used file option where you can 'pin' your documents and sheets in Word and Excel. So quiz question... Was this option available in 2007 for Access. Answer no. I made the suggestion via Microsoft Connect to also add this feature to Access and why not... every other office app had it. And now see what happend!

My next wish?

I've been praying for a magnifying option in
form designview for a couple of versions now and it hasn't been implemented yet. Well just keep posting my wish.. maybe next version! Some day we'll get there ;-)

Friday, March 26, 2010

OneNote: Linking to skydrive?


I've been using OneNote for a while now and i have to say it's one of my favourite apps. Sure there are some issues and one of the things that really bothered me was the fact that i couldn't share my notebooks very well. I use five pc's in daily. Huh 5 pc's you say? Yes five pc's. Let me explain.
I use two laptops for work. One laptop for production work and one for testing the various environments e.g. office 2007, office 2010 etc. I also use two netbooks. One solely for internet actions like reading and actively participating in newsgroups, reading articles and staying up to date surfing for new technologies. I also have another netbook for various options e.g. testing, internet and for sharing with my family. Finally we (family) use as regular desktop pc for internet and gaming. Kids also like to play as one can imagine.
So what I would like to achieve is a central point of storage where i can store my OneNote blocks and being able to reach them everywhere at anytime i like. Sure putting the stuff on a stick would be the simplest solution but the again how many sticks do you use? Right i have to may of those laying around to call myself organized in that way ;-)
Networkdrive? Tried it but i have to be honest i'm looking for the option to just turn on the pc and click my onenote and then without having the hassle of making connections to the various options before reaching by blocks being able to go to work and make my notes.


I've read great blogs, articles, tweets about various topics that i would love to clip them to my onenote block. And in office 2010 it seems it can be done via skydrive? Yes skydrive i've been dreaming about this since skydrive is around. Wouldn't that be the most perfect place there is to store my onenote blocks. Now everytime i turn on one of my laptops or netbooks i would be able to sync my onenote blocks via skydrive just by logging in to skydrive.